I receive an incredible number of questions about my portrait photography setup, it’s far from professional but I figured I would address all the queries by creating a resource here. My setup is a work in progress and I experiment all the time, but if you’d like to know how I created this photo…

… then do keep reading 🙂
Step 1: Pick your camera
I’m partial to DSLRs as the various settings allow flexibility for shooting in different lighting conditions and achieving creative effects. DSLR cameras ain’t cheap, if you’re new to photography, point and shoots have come a long way and there are many reasonably priced options on the market.
Here are my tools of choice…

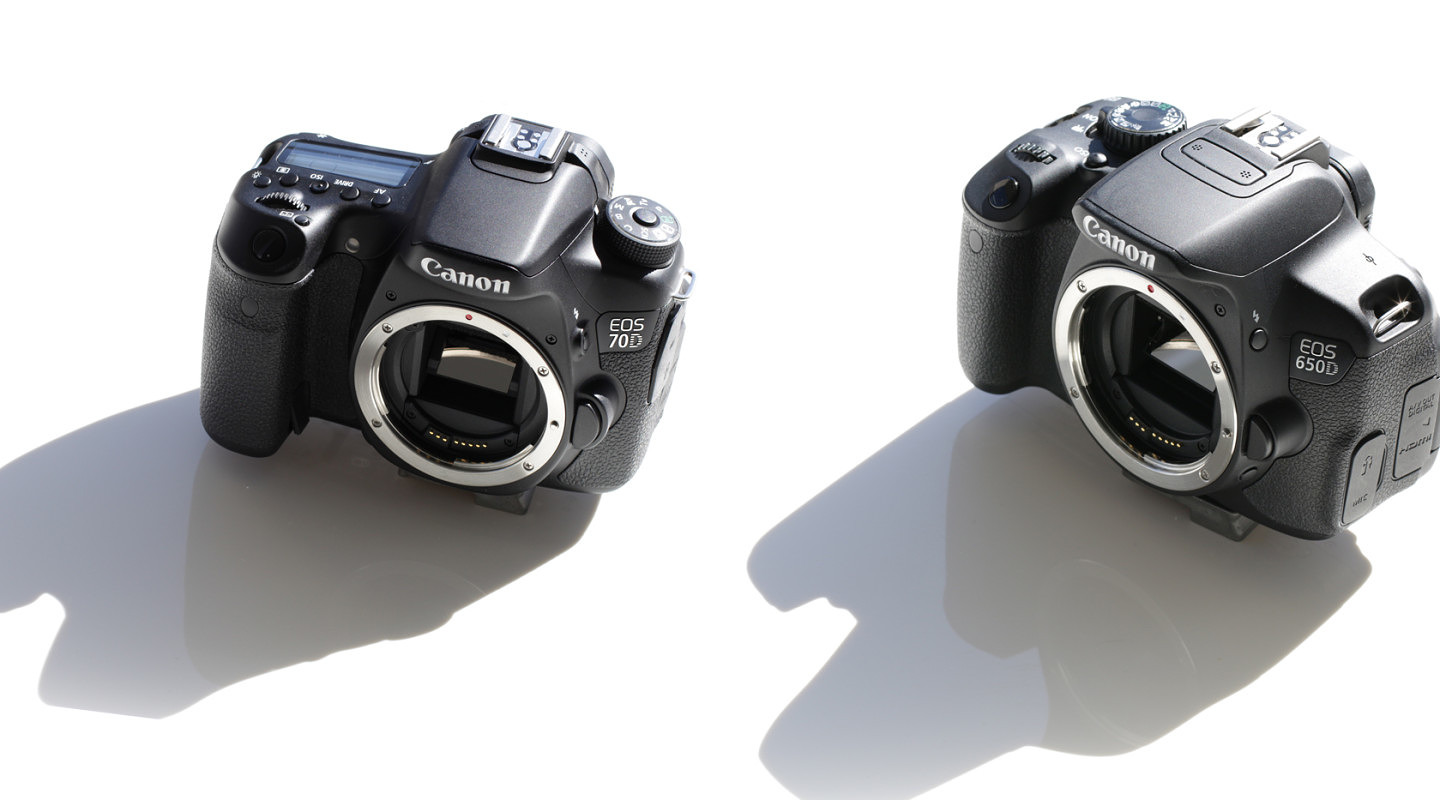
For stills, I switch between a Canon 70D and a Canon 650D, whichever is fully charged (technical, I know). The particular DSLR is not so important, it’s more about the lens. Lenses range from $120 to however-much-you-want-to-spend (seriously), the Tamron 24-70 is a versatile lens that allows zoom while the Canon 50mm prime is perfect for capturing detail (no zoom, you have to situate yourself a solid metre or two from the camera).

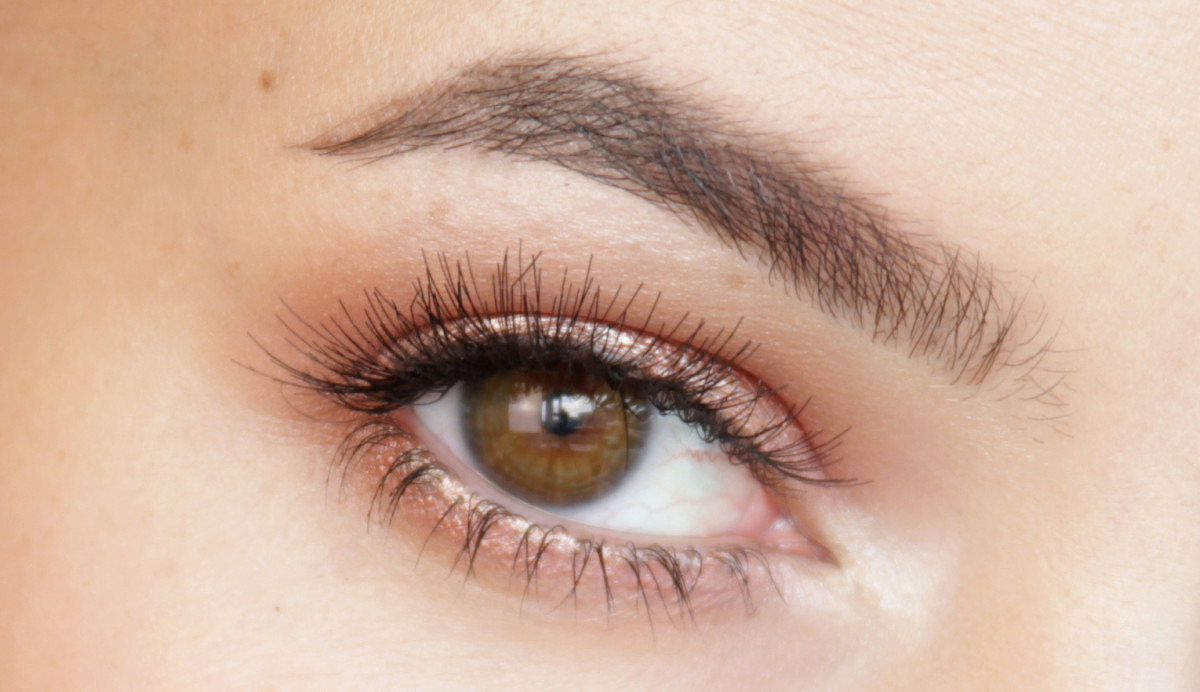
DLSR settings are perplexing and I don’t pretend to understand it all. Disclaimer aside, auto mode is the devil and I set everything manually. I tend to set my aperature at ~3.5 – if you look the portrait above, you’ll notice that the background is quite blurry. This is known as BOKEH (yes, capitals are necessary) and I love me some BOKEH. I then switch around the ISO and shutter speed until the photo is the right depth, not too light or dark. Hey, I did say this wasn’t professional.
Other noteworthy settings: set picture style to neutral (prevents yellow casts and over saturation) and set custom white balance (links to tutorials at the end of this post).
Step 2: Gather optional tools and props
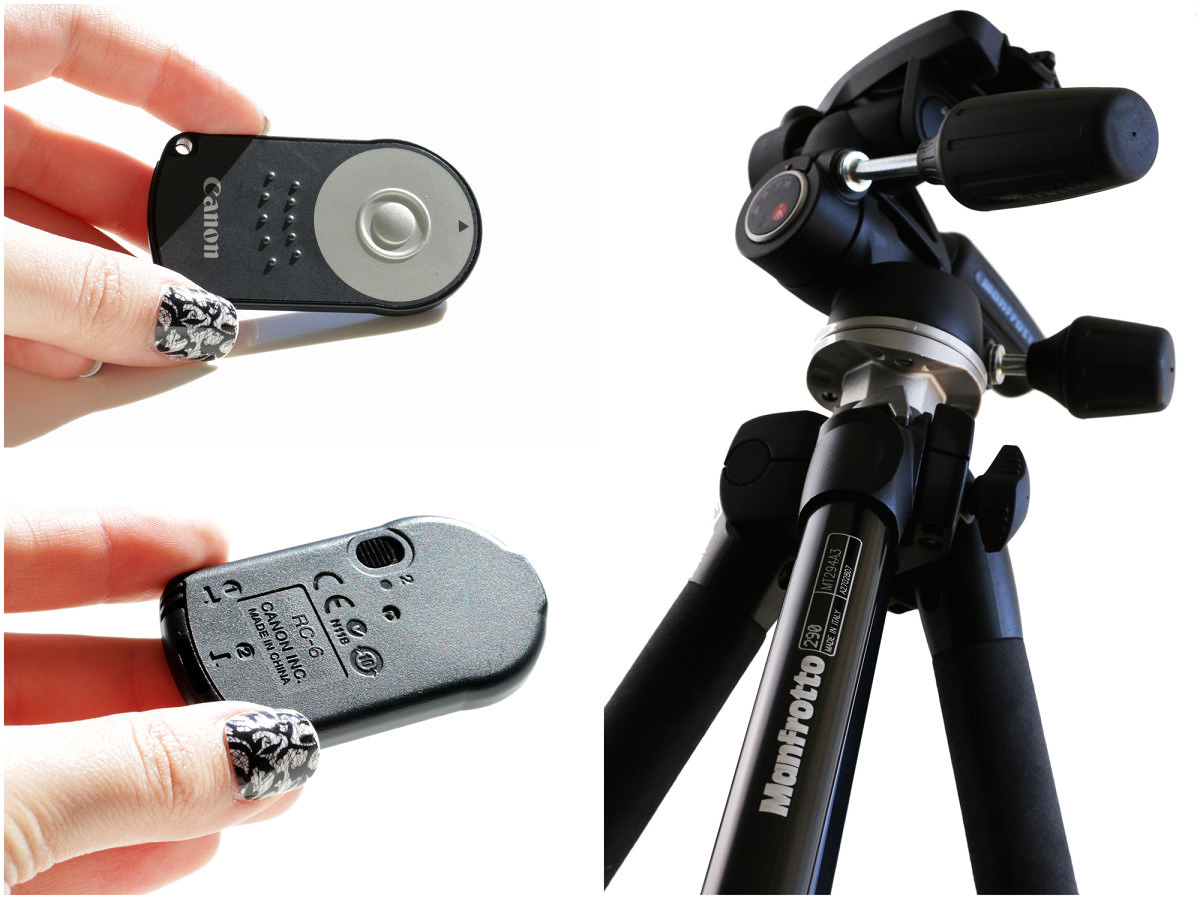
I couldn’t do without my tripod (okay… multiple tripods) but at a pinch, you could set your camera on a stack of books – you’ll need about 50 hardcovers, get stacking. Camera remotes also save a lot of time and heartache (especially if your lens insists you sit out of arms reach), although a very patient significant other works too.
Step 3: Find a window
Lighting is the single most important element – you could get away with a very basic camera if your lighting is on point. For portrait photography, I’m big on natural light: it’s flattering, allows a good amount of natural shadow and tends to depict makeup true to colour.
A note on flash: I never use it and unless you have external flash tools and a wealth of knowledge, I would recommend steering clear. Occasionally, I’ll assist with studio lighting but more about that later. Here is my living room…
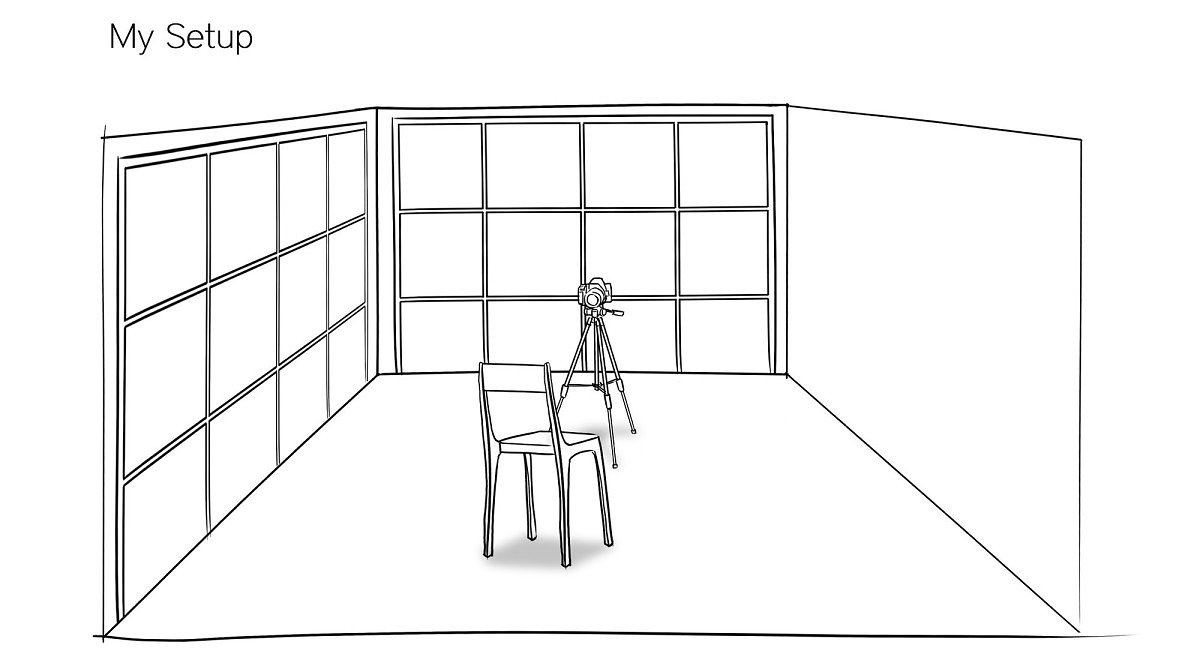
I’m lucky enough to have a light drenched home, so I’ll set up my tripod and seat in an area surrounded by windows. I should mention that ideally, you want diffused daylight and not direct sunlight beaming on the face or things will start to look washed out and yellow. I take pictures at noon, well before yellowed sunset light because my life revolves around makeup.
Let’s say you don’t have ridiculous windows like myself, find any window and sit in front of it, like this…

Consider your background, too. I like a bit of interest but not excessively busy, preferably well lit. BOKEH blurs most mess anyway.
Step 4: Consider extra lighting
Totally optional, but occasionally I’ll assist the natural light with studio light. Softboxes are relatively inexpensive on Ebay – relatively being the operative word here, studio lighting can break the bank. Back to my living room, you’ll notice that I have windows in front and to my left, but no windows to my right so…
I’ll pinch a rectangular soft box from my studio setup and place it on the right, facing towards me. This allows for more even lighting, so I don’t have strong shadowy areas. Cheeky hint: if you wanna snoop someone’s lighting setup, look to the eye lights… you can clearly see a rectangular soft box to one side of my iris.
When purchasing studio lighting, opt for daylight balanced bulbs (5200K) which is a rather crisp white light – warm lighting will likely produce yellow portraits and confuse your camera, and you wouldn’t want that!
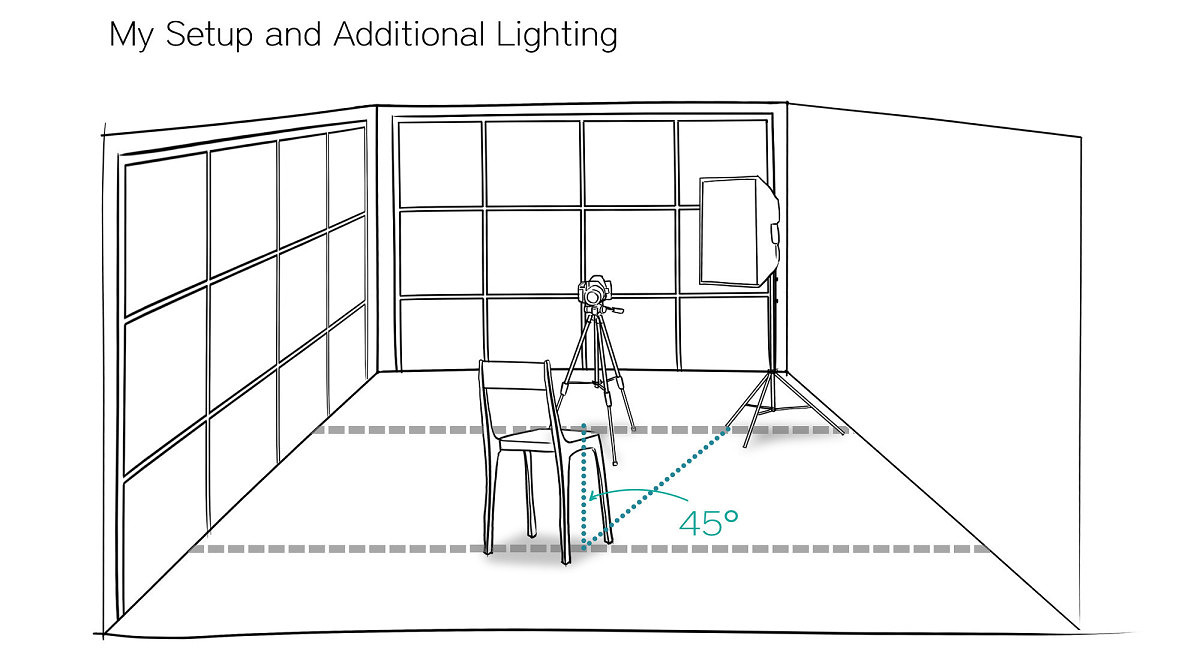
Back to the basic, single window setup. You may not require any additional lighting, but if you want to go the whole mile you can set a soft box on either side of you at approximately 45degrees, like this…
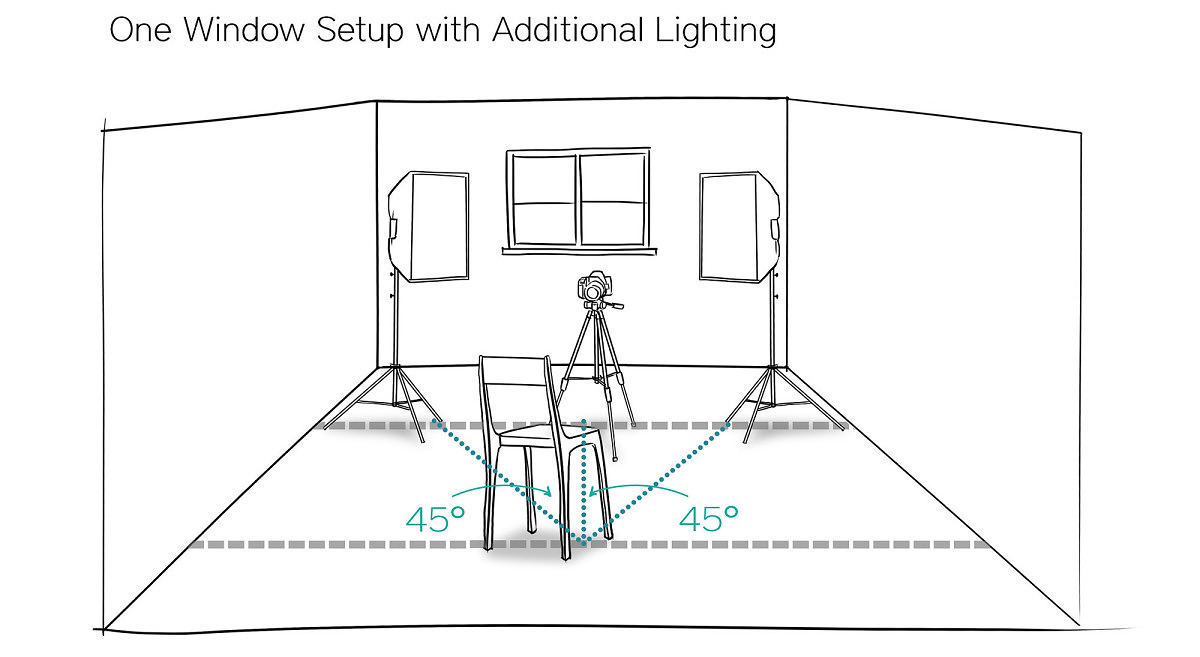
I used this setup back in the day and it served me well.
Step 5: Get crazy experimental
Take lots of photos – it’s not vanity, it’s science. Fiddle with camera settings, get closer to the window, move your lighting further away from you etc. It’s not about right or wrong, it’s about discovering effects that YOU like and learning along the way. When everything seems less scary and overwhelming, then turn to youtube – there are countless tutorials on there (apparently you can learn lots about makeup, too).
Online Resources
Here are some tutorials and links that may be helpful, no affiliation.
DSLR Settings for absolute beginners // Click here. This one is very long but very thorough, get a snack.
Custom white balance // Click here. This applies to all Canons. If you’re using a point and shoot, some white in your composition will help the camera set its white balance correctly.
Overall good tips on portrait photography // Click here. This is more about angles and composition, beginner friendly.
Natural light versus artificial light // Click here. Some good chit chat about lighting by Shameless Maya, who is a youtuber that has a photography and filming playlist. Highly recommend you check her out!
The rectangular soft boxes I use // Click here. These have an Australian plug, make sure you buy equipment that is suited to your power supply (learnt this the hard way).
Canon 50mm Lens // The exact Canon lens I use. Click here.
Tamron 24-70 // The Tamron lens I use, this one is pricy but transitions well to all sorts of photography. Click here.
Illustrations in this post // Courtesy of Anna Spencer, a fabulous illustrator. Contact her at recneps02@yahoo.com
Did you find this post helpful? Or at least… interesting? If you’d like to see more posts on photography, leave requests in the comments below. If you have any additional questions on portrait photography, leave them below too and I’ll do my best to answer!
If you take away nothing else from this post, remember this: the vast majority of youtubers and bloggers I’ve met have bluffed and experimented their way to awesome photos. Don’t be overwhelmed by technicality, just have fun.
xxkarima
I’m so in love with your webpage design, it’s so beautiful!
Thanks Erin! My boyfriend designed and developed the site, I’ll pass the compliment onto him 😉
xx
Honestly, I wasn’t interested in this particular topic and I just came here to read beacuse… Well, Karima. Whatever you write, I read; whenever I get a mail from Shameless Fripperies, I go into my maniac mode until I reach the end of the post (and then long for more haha – women). That being said, I loved every word you wrote here and I read it with utmost attention and genuine interest; this post was far from dreary, even for me who came here just because I didn’t want to miss a post. These illustrations of your setting though – they killed me, I think they are genious and so straight forward, not confusing in the slightest. I can only imagine the amount of useful information people who actually needed help on this topic got from this post. Kuddos to you Karima, you and Lisa Eldrige rule the world of blogging, youtube and beauty community in general. Keep doing what you do and please never change. I love you and many kisses from Serbia :*
I completely agree with this :* 🙂 ^
Agreed! The illustrations are brilliant, the explanations so clear. Like Milena i didn’t know if i’d be interested and i loved learning all this 🙂
Aw thank you, Milena! I appreciate your support, even when the topic at hand doesn’t directly apply to you 🙂
I had an illustrator do those illustrations (I did try myself, apparently I can’t draw to save my life haha).
Thanks again, too kind <3
xx
This is so helpful! I rock a Canon 1000D myself (which I adore!), but I think it’s time for an upgrade. I’d love to have a set up with a remote etc for self-portraits – it’s so much easier to show how makeup looks that way. Right now I only use natural lighting, but I’d love to use different lighting sources for the sake of consistency.
I used to hold the DLSR while I took portrait shots and it made my hand SO sore! Remotes and tripods are a lifesaver.
I use a combination of natural and artificial light and to be honest, I’m okay with my lighting being different in each photo, it adds a bit of interest 🙂
xx
All on point! Lighting is the most important. Our sunlight here in Malaysia is much warmer, and photos are best taken before 11am. I have explored the possibility of perhaps investing in some Kinoflows, but darn, they’re expensive. I’m currently using a Tamron as well, but I should look into 24-70. I also have a Canon 50mm prime lens, and I bought an additional tool (the reverse ring) so I can flip the lens and take macro shots for fun 🙂
Glad you concur, Lily!
11am is… early lol. I looked at those Kinoflows – do you have any experience or info on them? I’m curious how they compare to softbox lighting (they look as though they take up less space and that would be a GOOD thing for my studio setup… let me know).
Instead of a reverse ring, I use extension tubes for my macro shots 🙂 They’re so cheap and so effective.
xx
I shall look into extension tubes 🙂 I watch some YT videos on how pros do head shots and if budget isn’t a problem, they recommend Kino Flos. The light is consistent (great for videos), soft and you don’t get unsightly shadows. You’re in Sydney, right? You can check out the lights personally at
JBG (John Barry Group)
Unit 1, 706 Mowbray Road
Lane Cove, NSW
I found the address on the Kino Flo website. It’s quite expensive where I am, and there is no shortage of sunlight, so I shan’t indulge myself in these pricey equipment for my blog which is only a hobby 🙂
Hmm yeah I did the research but I can’t quite decipher how Kino Flows are better than regular soft boxes (except that the former emits less heat).
I shall read up on it more 🙂
xx
Im actually quite interested in how u take pics of makeup products!! Tips on that would be awesomeee
I can do a post on that, too! Thanks for the suggestion 🙂
x
THANK YOU! Very helpful!
Woo! My pleasure 🙂 x
Very helpful, thank uou
I’m so glad! xx
This is actually a guidebook for anyone who wants to start filming and has no idea how to. Amazing post. I’m sure it will be referred to numerous times. Great job!
Thanks Aurica, hopefully it helps someone out!
xx
Brilliantly simple, helpful and consise guide. Thanks for the pointers!
I’m glad you liked it 😀
xx
Thank you so much for writing this! It has been bookmarked and now I’m going to read all those links! I’d love to see more posts about technical stuff like this 🙂 currently teaching myself to film and edit and let’s just say I’m not a natural talent :L to have photos and videos as professional looking as yours is the dream! xxx
Hey Libby,
Haha I was no natural talent either, it’s been a longggg work in progress although I’m happy to share any knowledge I can pass on!
I’m thinking about other blogging related topics that I can write about – anything that you’d like to see?
xx
How thoroughly helpful and simple to follow even for total newbs like myself! I think I’ll bookmark this for “fumblings into filming” (ooh, there’s my file name, haha!) so I can reference it as I start to set myself up!
THANK YOU!
I, too, would love to see more of these Blogging/Vlogging Photog 101 type os posts; even if one isn’t planning on blogging or vlogging, most everyone takes a selfie or photo of friends, family, or their pet cat (ahem, guilty!) and could benefit from ideas on lighting angles at the very least… Right up to making Instagram-worthy, softly glowing pics of their artsty makeup looks or whatever!
Really must co-sign Milena’s comment, Karima. This is another fabulously written post and I loved your simple and SO clear illustrations! More, please?
You know, when you’re not *too* busy wowing us with your makeup-fu Ninja skills and kicking butt at uni! 😉
Much appreciated! xx
Hey Lisa 🙂
Was it easy to follow? I tried to make it newbie friendly but I have the tendency to be verbose 😛
Also: fumblings into filming is genius, really.
I’m actually terrible at the traditional selfie, I’m convinced that my phone hates me! If you can think of any other blogging/vlogging/anything topics that you’d like to see, I would LOVE to hear it. I’d like to branch out a bit 🙂
xx
your pictures are beautiful. one day. maybe. now i just you my samsung tablet for most pictures lol.
Thanks Lena 🙂 We all start somewhere.
xx
You people with your sunny days and LIGHT! I live in Pennsylvania; we have fewer than 30 sunny days a year. XD On top of that, my neighbor has this big ass tree right in front of my only window, which blocks out most of the light during the warmer months. Such a shame; natural light creates beautiful pictures.
I am very lucky in that respect! Although cloudy days seem best for portrait shots (less so for product shots grrr) since the light is so diffused.
I have a solution, eliminate the neighbour 😛
x
This is such a helpful post, thank you! xoxo.
My pleasure! x
This post was so helpful thank you!!
I’m so pleased you found it helpful!
x
Great read thank you with some very useful tips and tricks I will have to share this with my team.
Glad it’s helpful! 🙂
x
Very interesting article Karima! I think it was dummy proof written, chapeau to that! When i try to explain about settings and stuff i’ll probably get to technical 😉
Looking forward to read more of these articles, normally i don’t say much here. But i felt like it now 😉
As Erin said, your layout is stunning! Does your boyfriend has website? (company)
Haha I did try really hard to keep it simple.
My boyfriend freelances and works with some other companies also. He has his own portfolio, which is incomplete but you can view it here:
https://adrianciaschetti.com
xx
This was so helpful! I love the simple look you have going for your photos, videos and website. It looks very sophisticated and visually pleasing 🙂 I was wondering if you’ve ever used a ring light before? The circular lights that can either attach to the camera lens or self standing with the camera lens in the middle. I see tons of beauty gurus using them, I wondered what your opinion was, if you have one?
Hey Abi!
I have a ring light as part of my studio setup (it’s a very large ring light that has it’s own stand, so not one that attaches to the camera lens) and I like it, but unless you have a very bright room, it’s not a single solution. I pair the ring light with soft boxes so I’m evenly lit.
xx
It helped a lot. I always wondered how your images and videos are so perfectly taken! I enjoy your blog. Thanks for uploading good quality posts.
My pleasure, glad you found it helpful 🙂 x
this is perfect and has helped me for looking at the stuff i need for when Im going to do makeup routines and the like 🙂
I’m pleased 🙂
x
Love the diagrams, and it makes it so easy to set up! I’ve been taking my pictures next to a large window, but I’ve been lacking the additional supporting soft box. Thanks for the tips!
My pleasure, Tammi! x
Wow lots of work went into this article just so lazy people like me can have it all in one place. Thanks a lot!! 😉
Ofcourse, I’m glad you liked it 🙂 x
Hello Karima, I must say that I enjoyed reading this post. I have just recently found out about you and I absolutely love your blog. I’m a small blogger and could really use some more tips on photography and also on blogging in general, I hope you will find some time to write more about it. Kisses from Bosnia 🙂
Hey Monika,
So glad you found the post helpful! If you have any requests about possible blogging tips, let me know and I’ll work on it 🙂
xx
Hello, thank you for your work <3
I will also film on white background and I love your ratio light contrast, very good 🙂
Could you tell me wish iso, speed and aperture (f-stop) use you with your camera ?
xX