I make everything about food, I don’t even know.
Make sure you leave a comment for a fellow Australian Stevie! She is an absolute inspiration <3 Find her video here. Also, she has a hilarious Tin Can Challenge, I was gagging and laughing at the same time.
Here is my holiday inspired makeup tutorial for foodies…
Hello, everyone. Today, I'm doing a holiday inspired make up tutorial. I am not going to do the whole red lip thing because I'm actually a massive foodie in real life. Something you may not know about me, my life pretty much revolves around my very next meal. And I hate to admit it but red lipstick and food, they just don't mix. I will show you the look at the end with a bolder lip for those of you who are not as concerned about putting as I am. I also want this make up to be really long lasting because it's a party, right? I'm going to start with the primer. This is the Rouge Bunny Rouge matte primer and it's not your typical silicone heavy primer. And this is an absolute must for very oily skins or perhaps people who find that their make up migrates or separates or perhaps settles around the nose. I get that sometimes. And I'm just putting a very small amount mostly on my nose and perhaps a little bit just between my brows. I also find that this is a superb eye shadow primer so I'm just going to put a little bit of that on my lid. Next, I'm going to go in with a highlighter. This is the Burberry Fresh Glow and it's one of those sort of multi purpose products. It can be used as a primer. It can be used underneath foundation, over foundation. I'm going to apply it underneath my foundation today, mainly on the cheek bones and a little bit on the cupid's bow.
So now that I'm catching the light in all the right places, my long lasting foundation pick of today is the SUQQU Frame Fix Cream Foundation. Now despite the fact that this has an SPF, I don't find that it flashes back in photography but if that's something that you're concerned about and you anticipated there'll be lots of photos taken then you can just pick your favorite long lasting foundation that has no SPF. Then again, I tend to shine in photography at events which considering what I do here is already at its finest. So I've blended that over much of my face because presumably this is a special occasion and we want to look a little bit more perfected that we do normally. Now for the brows, I'm going to go for quite a graphic brow today because the entire focus of this make up, the focal point is sort of in this area. Now I don't normally do the whole rim the perimeter of your brow and fill it in because I think it can kind of take over my face but because I want a really clean and graphic brow today, I'm going to do that.
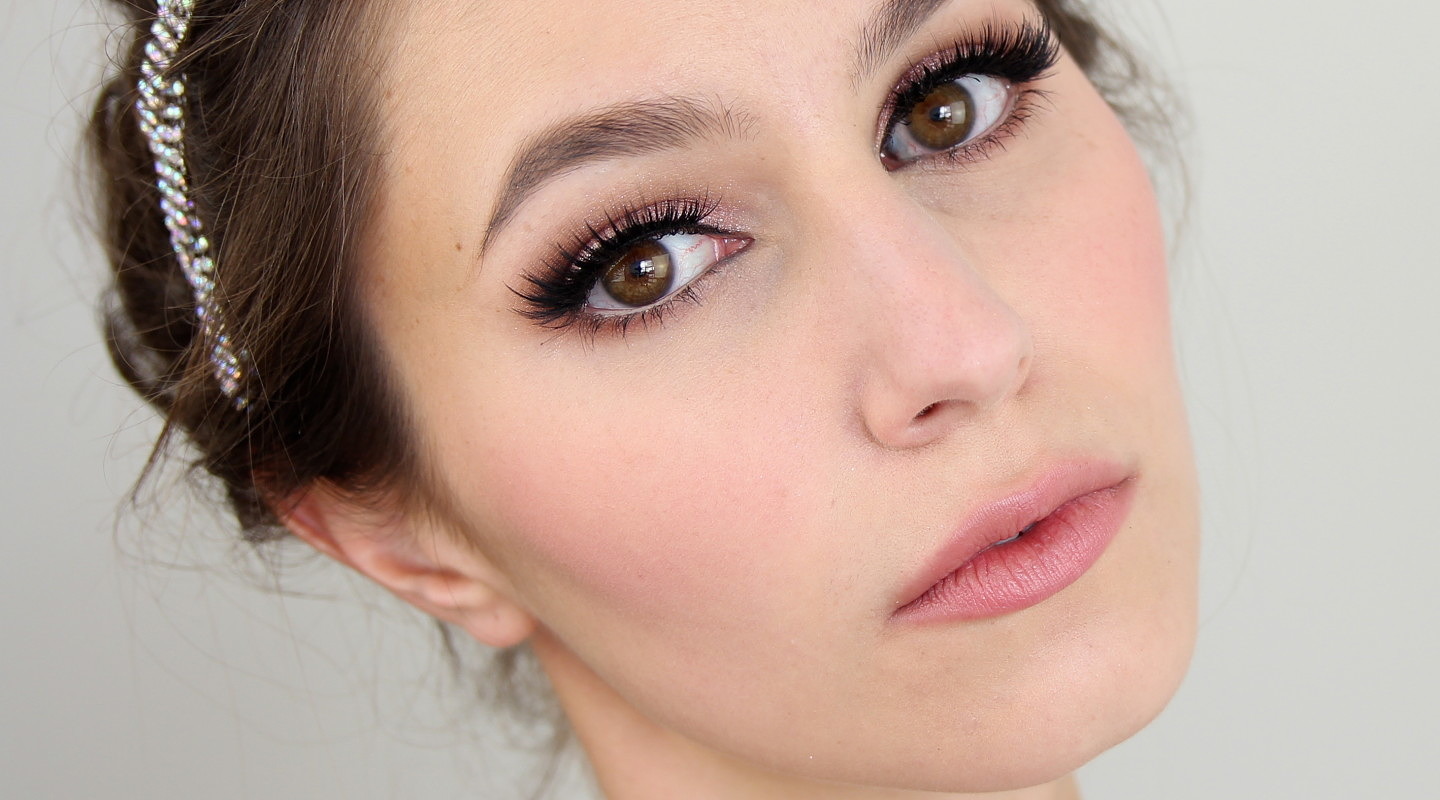
In order for me to make this wearable, I'm going to choose a shade much lighter than I would normally. So this shade is actually something that I would usually use on blondes. So I'm just mapping out the upper perimeter of my brow and also the lower perimeter. And then I'm just going to brush the excess product just through the body of the brow. And I'm not going to take this product all the way into the inner part of my brow because I want that portion to still remain quite soft. And for this look, I'm going to make my tail quite sharp and graphic. The trickiest part of graphic brows I think is getting the brows even and mine are terribly asymmetrical. So it's kind of winged liner in a sense. So that is pretty much my brows done. They're going to look a little bit strong for my face right now but it will come together in the end. The next thing I'm going to do is head straight for the eyes. I'm using a light shimmery cream eye shadow and you can use any like shimmery cream eye shadow. This isn't going to have much effect but it will become apparent a little bit later on why I'm doing and I'm just popping out all over the mobile lid.
Next, I'm going to take this light warm brown and I'm going to place that through the crease. And this is a matte shade. I've chosen a matte because later on I want to use glitter and I don't want this to be just a massive glitter fest, so adding a few textures in there. Okay, now for the fun bit. I'm going to use Chanel Fatasme and this is a super glitter suspended in a sort of clear jelly, and hopefully now it has become obvious why I used that shimmery shadow on the lid. Because you see it's a little bit transparent, semi transparent, so to speak. I didn't want any skin peeking through on the lid. I think that it looks a little bit more professional this way. I really like this one because it already has a binder in it, so it's not going to continue to danger off glitter all over your face throughout the evening or the day or what have you. So I'm using a synthetic brush with this one because it is a cream product and synthetic brushes tend to apply cream products a little bit better. And I'm building that up in sort of finish layers.
Now I'm really not being too precise with this. If you're particular and you didn't want to get any glitter in to the crease, I will suggest not taking this glitter all over the lid, perhaps keep it quite close to the lash line because you will get a bit of transfer. It's inevitable. Okay, so next I'm going to take this darker brown shimmery shade and I'm going to further define my crease. The reason that I'm using a shimmer here is because I have a glitter on the lid and a more matte in the crease. So this will help to create a more textural graduation. I hope that make sense. Basically, they're blending the texture in to each other. And now I'm just going back in with that matte medium brown shade and this will help to blend out the darker shade but also it will help to sort of brush away any stray glitter. And on to the lower lash line, I'm just going to place a bit of that warm brown. Make sure to connect that at the outer corner. And also perhaps I'll take a little bit of that dark shimmer around just on the outer third.
Okay, moving right along to the eyeliner. I'm going to do a relatively thick line of liquid eyeliner today because I have some serious lashes coming and I'm going to need that thick liner to disguise the bend of the lashes. Okay, so I've done a really basic thick eyeliner. I haven't done anything special. I haven't wind it out or anything. This isn't really about the liner, it's about the lashes. So now I'm going to tightline my upper lash line. This is a pet peeve of mine. When I say really thick eyeliner and little bits of skin peeping between the lashes, I think it looks really undone so I'm going to really aim to get between those lashes to get all those little bits of skin. And this is the best brush that I've used for tight lining. This is Hakuhodo J521D1 and it's just so small. It's absolutely perfect. You can just push underneath those lashes and wiggle. And those of you with very easily irritated eyes, you get a pass. You don't have to do this.
Okay, I've quickly applied some mascara to the top and the bottom lashes. This is just basically to make my lashes look back underneath the falsies but I did put quite a lot on the lower lash line because when I have such large falsies on the top, I think it looks a little bit more balanced if you have quite a load of low lashes going on too. So lashes are really the focal point of this look. So today, I'm going all out and I'm using this pair by Hose of Lashes and they're called Pixie Luxe. And this is similar to the Shu Uemura lashes in the sense that they have a really kind of stiff and thick bend. So it really helps to maneuver this with your fingers. That will help to make the bend a little bit more flexible and a little bit easier to apply but to be honest, I can't lie with you, these are always going to be a bit of a pain and a bum to apply. So wish me luck. And today I'm using Duo Dark Glue because the lash bend is really thick and black and my eyeliner is really thick and black and it's going to help to disguise the lash bend a little bit better.
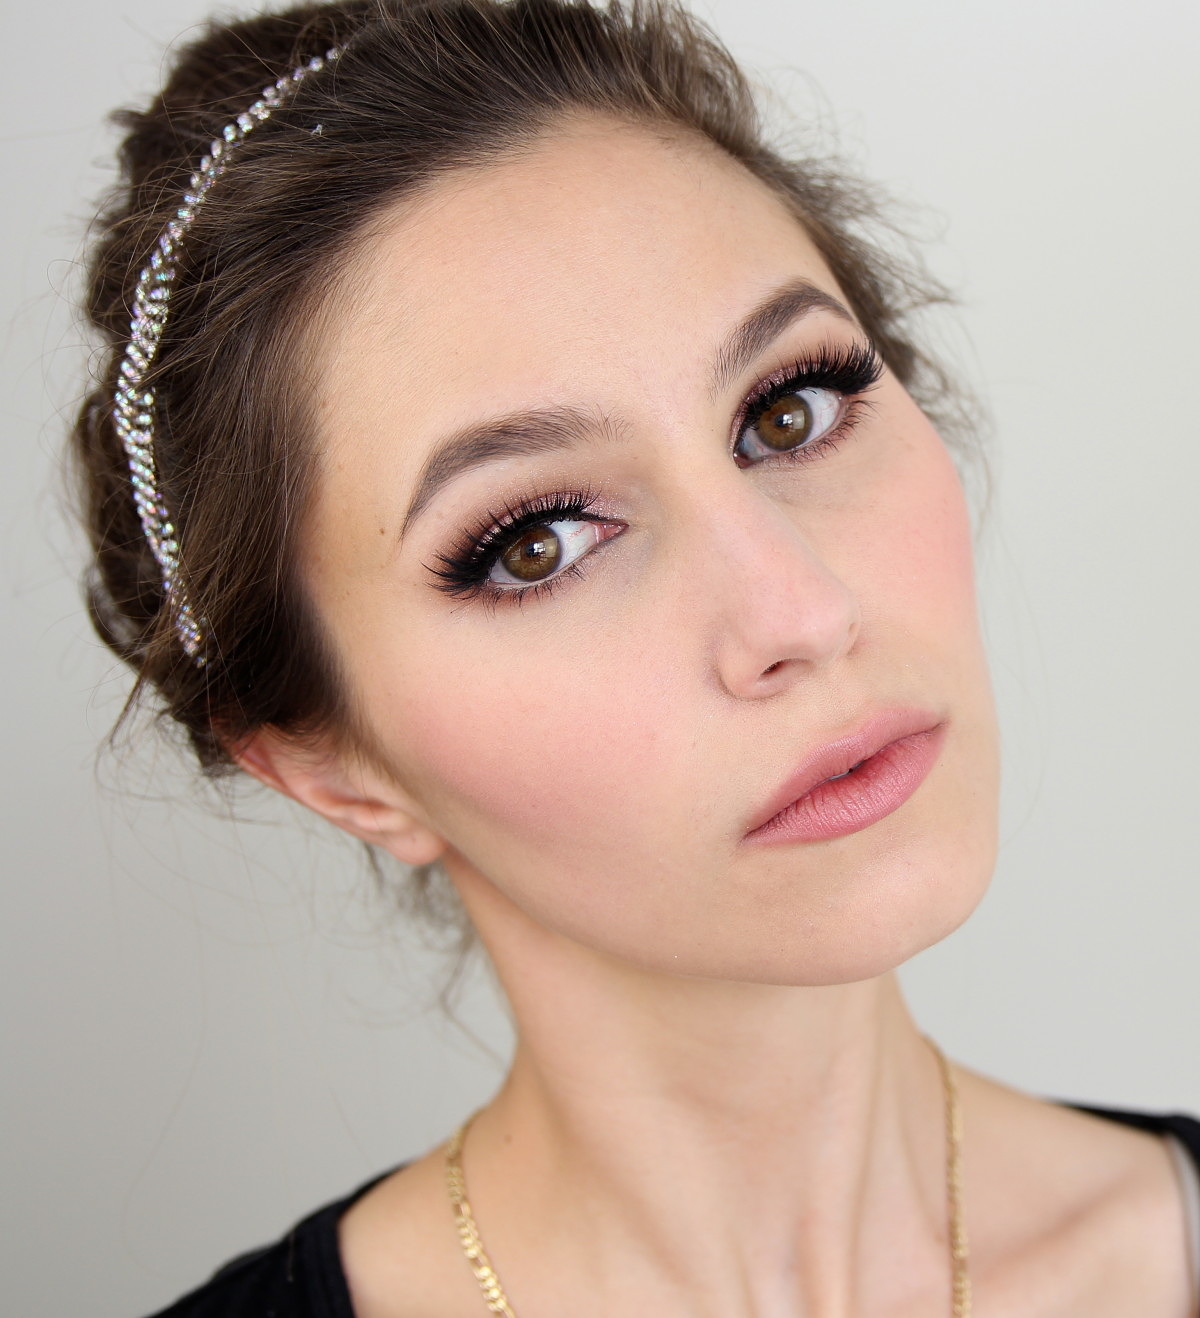
Guys, I can't believe this. I actually got this on in one go. Whoo! That deserves a thumbs up, don't you think? I think so. Okay, so that is the eyes done. I actually haven't had too much fall out, which if you worked with glitter you know how incredible that is. So I'm just going to take a little bit of Bioderma under the eyes just to pick up any stray glitter. And now I'm just putting a little bit of concealer underneath my eyes. By the way guys, thank you so much for all your recommendations for concealers in my last video. I'm still going through them and I have a lot of work to do. Right on to the lips, I'm going to use this lip mist by Burberry and it's called Feather Pink. It's a really pretty shade. It's super comfortable to wear. It's very low maintenance and it's cake friendly. So I'm going to apply this with a lip brush. Obviously, you could apply this from the bullet because of it is sheer but I've just got in to the habit of using lip brushes now.
And for blush, I'm going to use this Rouge Bunny Rouge I think it's Gracilis. Am I pronouncing that correctly? I hope so. And it's a moby pink. And this one gives off a sort of wintery icy vibe to me so very seasonally appropriate for many of you. I have left this to last because I wanted to really gauge how much blush I would need and I think that with all the stuff going on, I only need a little. I'm going to take off most of the product in the back of my hand and you can apply blush wherever you feel is most flattering for you. For me, I feel like it's on the back of the cheek bones. It almost works just short of shade the face and give it a little bit more shape. Here is the look with a bolder lip. This is for those of you who are willing to give me your serving of cake and I'm not sure. Which do you prefer, the bolder lip or the pink lip?
If you want more holiday inspired looks, go check out a fellow Australian, her name is Stevie. I'm going to link her channel here and also in the description box below. Guys, she is the sweetest. Go check out her channel and tell her that I sent you. And that is my holiday make up for foodies. Can this be a thing? I have no idea how I've managed to make this about food. This tutorial has gone off on a bit of a tangent but we're going to go with it. I hope you all have a wonderful holiday season. Party hard, but not too hard. Party in moderation and eat plenty. B-bye.
Final Look

Nail Polish I’m wearing in this tutorial
OPI My Favourite Ornament (GLITTA!)
Complete List of Products
Rouge Bunny Rouge – Mattifying Primer
Burberry – Fresh Glow Fluid
SUQQU Frame Fix Cream Foundation – 002
Makeup Forever Aqua Brow – #10
Tom Ford Cream Colour for Eyes – Pink Haze
Tom Ford Eyeshadow Quad – Cocoa Mirage
Chanel Illusion D’Ombre – Fantasme
Geisha Ink Liquid Liner – Black
Kate Gel Eyeliner – Black
Lancome Hypnose Star Mascara – Black
House Of Lashes – Pixie Luxe (I paid for these, FYI)
By Terry Touche Veloutee Concealer – Cream
Burberry Lip Mist – Feather Pink
Rouge Bunny Rouge Blush – Gracilis
I just wanted to take a moment and say thanks for reading, it really means a lot to me. I hope you all have a wonderful holiday with your families, eat ALL TEH tasty things 🙂
xxkarima
Oh my god! This eye makeup is EVERYTHING. You’re such a beauty, Karima!
I’m going to try this lighter graphic brow. I’ve been all about the bold Cara Delevingne-esque brows lately and I think a lighter brow with a well-defined shape is so pretty! I love your hair band here, too. Super festive. 🙂
I love it when you post a video. Beautiful as always.
I keep on kicking myself very hard for not buying cocoa mirage. I opted for cognac sable after much deliberation because I wanted to make my purchase worth it. Now I rarely use to because matte formulas are my preference. Also because I followed the hype !
Hey Michelle! I actually LOVE Cognac Sable but if you prefer mattes then it probably won’t float your boat. Maybe you can hint to your loved ones and receive a Cocoa Mirage under the christmas tree this year? 😉 x
Love love love! You have fantastic eyes to begin with :). Fighting the urge to buy Feather Pink right NAOW!
Thanks Deb! Do you have a sheer pink lipstick? It’s a gorgeous product but if you already have a sheer pink lipstick, you’re set. xx
Beautiful!! Thanks for sharing 🙂
You look great, and Feather Pink is one of my favorite Burberry Lip Mists!!!
Anne! Familiar name, I know you :D!
Feather Pink is gorg, such a great everyday shade. xx
LOVE, the headband you had on in your tutorial! It made the look soft and feminine. Looking for something like it. Where did you purchase it?
Hey Cristina!
Not sure if you’re Australian but I purchased it in store at a place called Forever New. xx
What a gorgeous look! I prefer heavier eyes and lighter lips for the same reason – bold lips are way too high maintenance. I really love what you’ve done with the textural gradation – a very interesting (IMO) technique I haven’t seen very often. You really do pay great attention to detail!
Btw, how do you like the Chiku z-4 for blush? I’m considering purchasing it, but I’m not sure whether I should for for that one or the TF$ cheek brush. The. TF$ is much more accessible for me since I live in Sydney.
Hey Jen 🙂
I snack too much for bold lips, dammit! Textures are just as important as colour, in my opinion!
I love the Chiku Z4 for blush, it’s kinda similar to the SUQQU Cheek Brush but a little bigger and denser. Very soft and good for moderately pigmented blushers (prefer the SUQQU for heavily pigmented face products). I can’t compare it to the TF$ Cheek Brush because I don’t own that one but I’d say you can’t go wrong with the Z4, it can be used for so many things. xx
i love your hair here! can you make a tutorial?
thank you!
Hey Maria!
The hair is really easy to recreate, I just teased my hair around the hairline and scrunched it into a messy bun. I secured the bun with bobbi pins and put on the headband, voila! xx
Karima, I’ve been following your blog for the past 2 months now and I just love your approach to makeup and skincare!
Just curious- I have combination skin, it tends to be more dry/flaky in certain areas around the winter months, however I definitely suffer from a shiny T-zone throughout the day. I’m very intrigued by this RBR primer. Would you suggest this for somebody with combo/dry skin or do you presume it will overly mattify the skin and cause more dryness? Thank you in advanced 🙂
Hey Melissa! Thanks for your kind words 🙂
I think the RBR primer would work for you but you’d have to moisturize well beforehand because it is VERY matte, but I don’t find it particularly drying and I have a normal skintype. The key is using very very little, a few pinheads worth on the t-zone is plenty. That being said, it’s not a typical silicone primer so it won’t smooth over flakiness per se so keep that in mind.
Hope this helps, if you have any more questions feel free to ask.
xxkarima
Hey Karima!
About the By Terry concealer, can it double as a highlighter? Like the YSL? I could just check your video but my internet has hit its bandwidth limit 😐 Also between the By Terry and LM Secret Camouflage for under eye concealing, which do you recommend? I’d classify the depth of my undereye circles as moderate with a slight purple tinge. Thanks in advance Karima!
A
PS Though you look amazing in anything, I prefer a darker brow on you :] Much love Karima, hope you’re enjoying your amazeballs new studio :]
Karima you are incredibly beautiful and i love how honest you are in your reviews! I literally check your blog before I purchase something but I also keep in mind your skin is naturally perfect so I always go for the foundation you say has a medium coverage! haha Love your blog all the way from Ireland 🙂 x
Aw thank you for your kind words, Laura! I tend to prefer medium foundations myself, they’re more versatile (can be sheered out, can be built up etc). x